ClickUp Integration
The integration between PractiTest and ClickUp allows you to report and sync issues from a PractiTest run, directly to a ClickUp task. Information from the run will be automatically populated in the ClickUp task. You can also sync existing ClickUp tasks to PractiTest issues. Changes in linked task's status, description, and name will be reflected in PractiTest.
Configure the ClickUp-PractiTest integration:
The following are important points to know and to prepare up-front before setting up this integration:
- The setup needs to be done by PractiTest’s account owner.
- You will need to create an OAuth App in ClickUp (we will show you how), and retrieve your Workspace ID. The OAuth App can only be generated by the Workspace Owner or admins.
Note: PractiTest doesn't support the integration with ClickUp workspaces using Custom Task IDs.
PractiTest Account Configuration
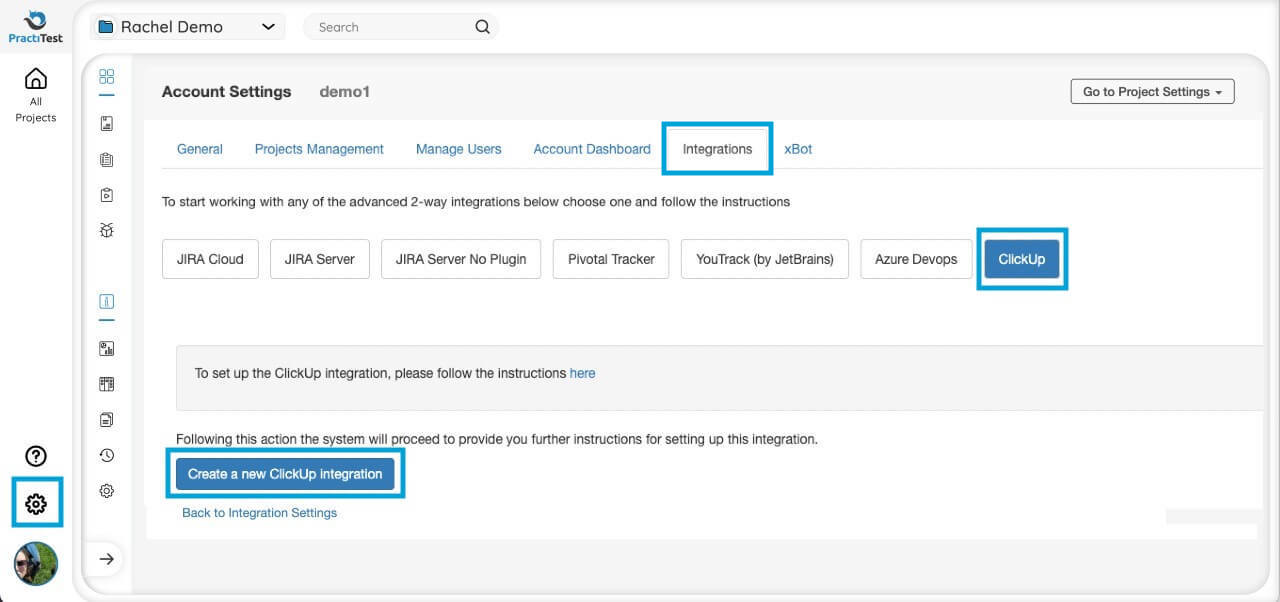
Start by configuring the integration in the account settings. Go to Account Settings > Integrations tab (If you are not an account owner, ask your account owner to take the following steps). Press “Create two-way integration” and choose the ClickUp integration. Press “Create a new ClickUp integration”.
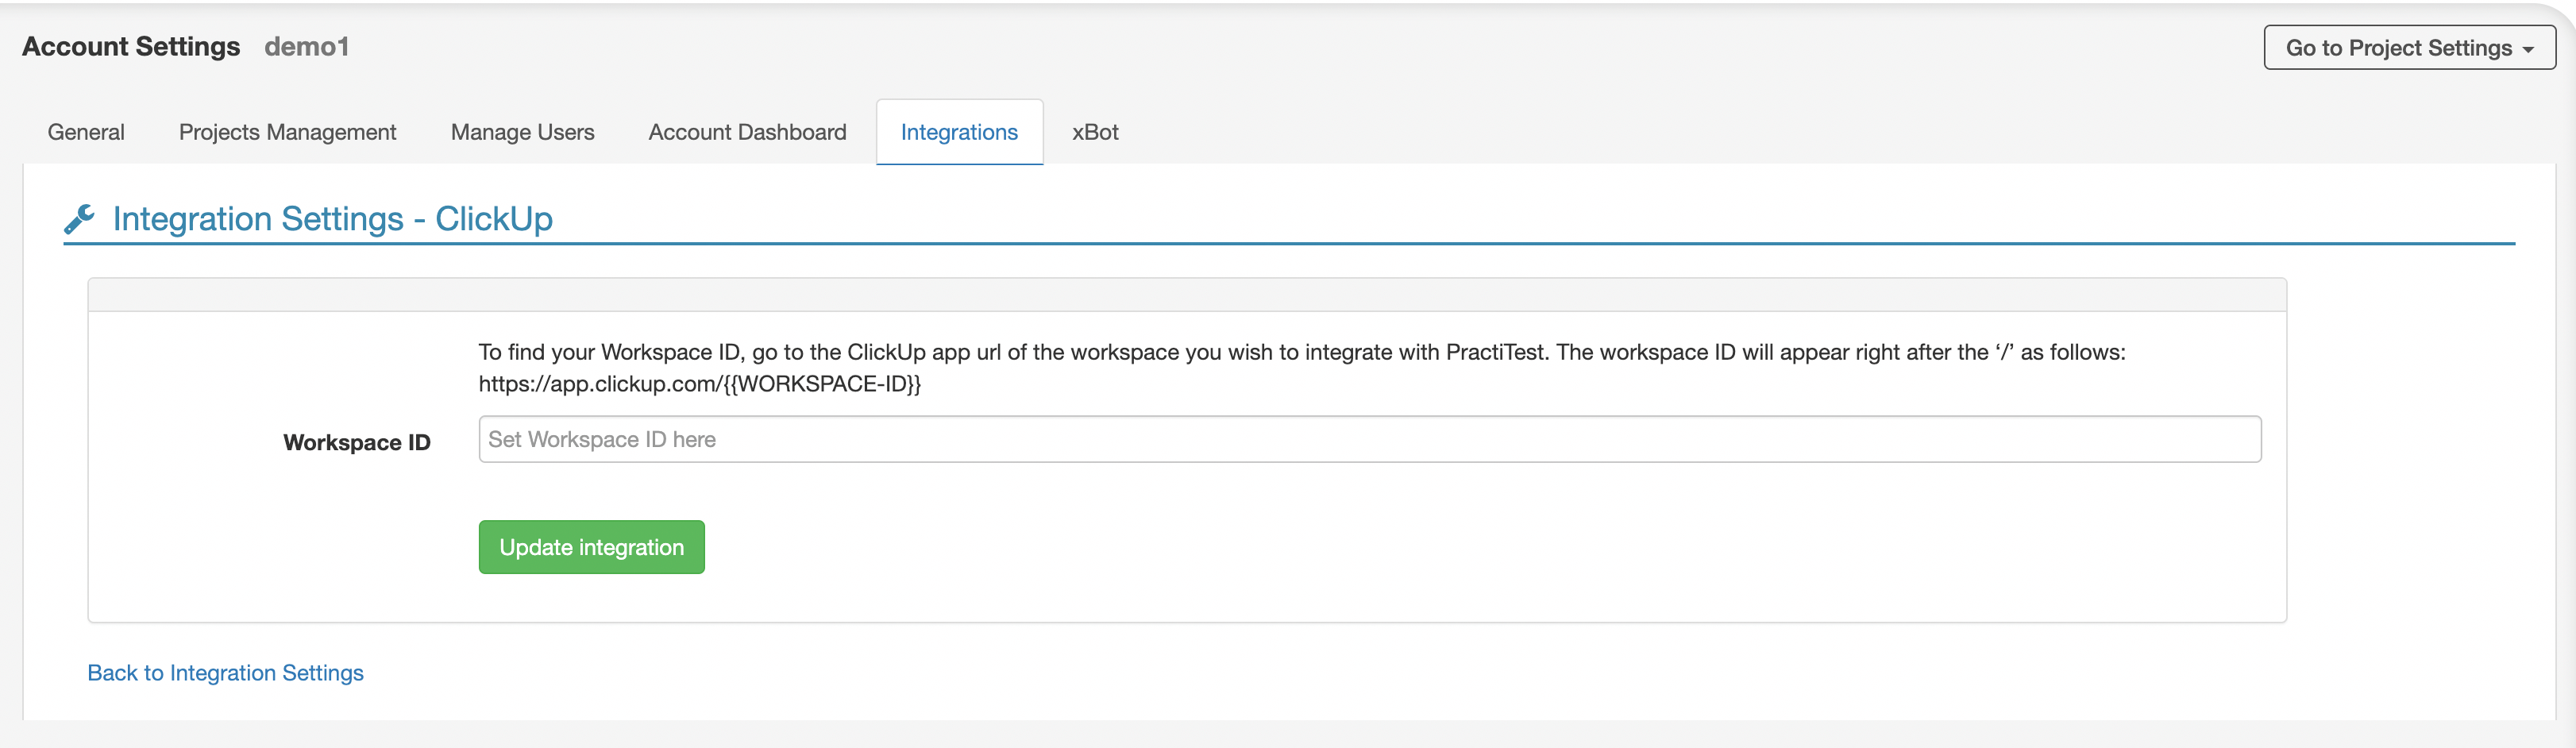
In the next window, you will be requested to fill in your ClickUp “Workspace ID”. To find your Workspace ID, go to the ClickUp app URL of the workspace you wish to integrate into PractiTest. The workspace ID will appear right after the ‘/’ as follows: https://app.clickup.com/{{WORKSPACE-ID}}
Copy the workspace ID into the PractiTest integration page and click “Update Integration”.
You will be redirected to ClickUp where you will be asked to choose the workspace you want to integrate. Please choose the same workspace you retrieved the Workspace ID from. Once you choose your workspace, you will be taken back to the PractiTest Integrations settings and a success message will appear briefly.
Next, you will need to configure the integration for PractiTest projects as described below.
PractiTest Project Configuration
Go to Project settings > integrations tab > Press ‘Activate’.
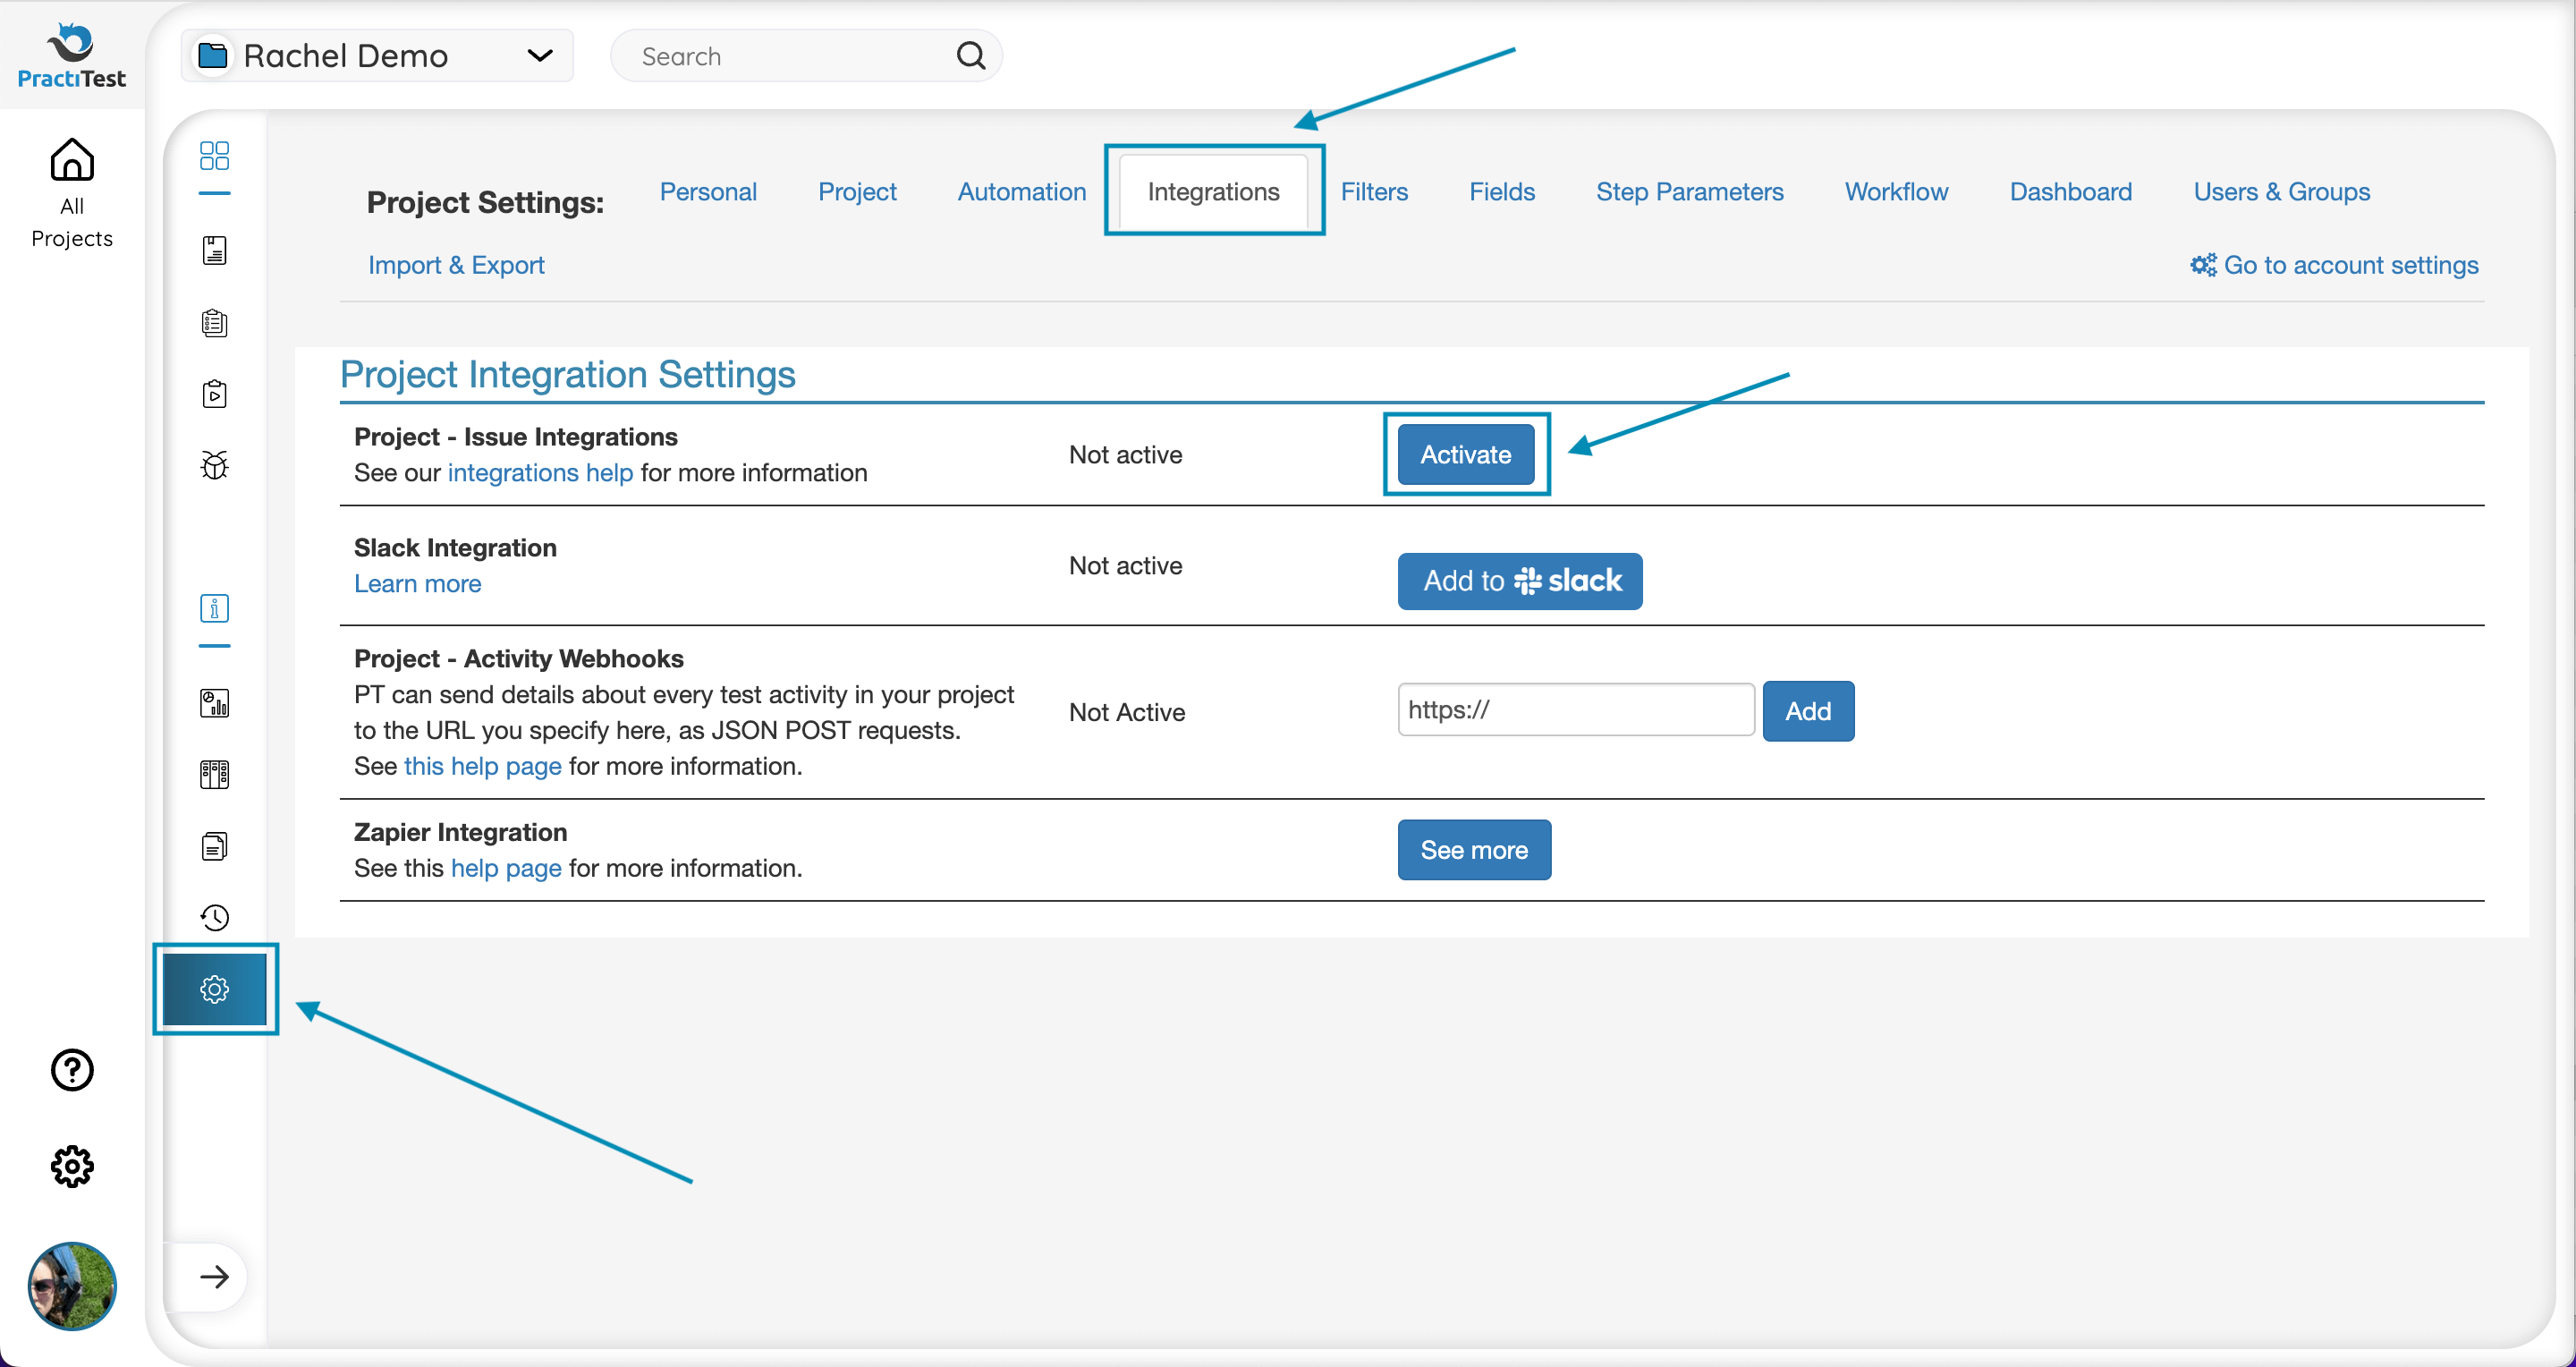
If the account settings were configured correctly, you will see the ClickUp integration - press ‘Activate’ inside the ClickUp box (If there was an issue with the account settings configuration, the account owner will have a link to complete it).
Add a new row for each Space-List pair that you want to have when reporting an issue from a PractiTest run to ClickUp and when syncing issues or requirements between the two systems. Click ‘Update Issue Integration’.
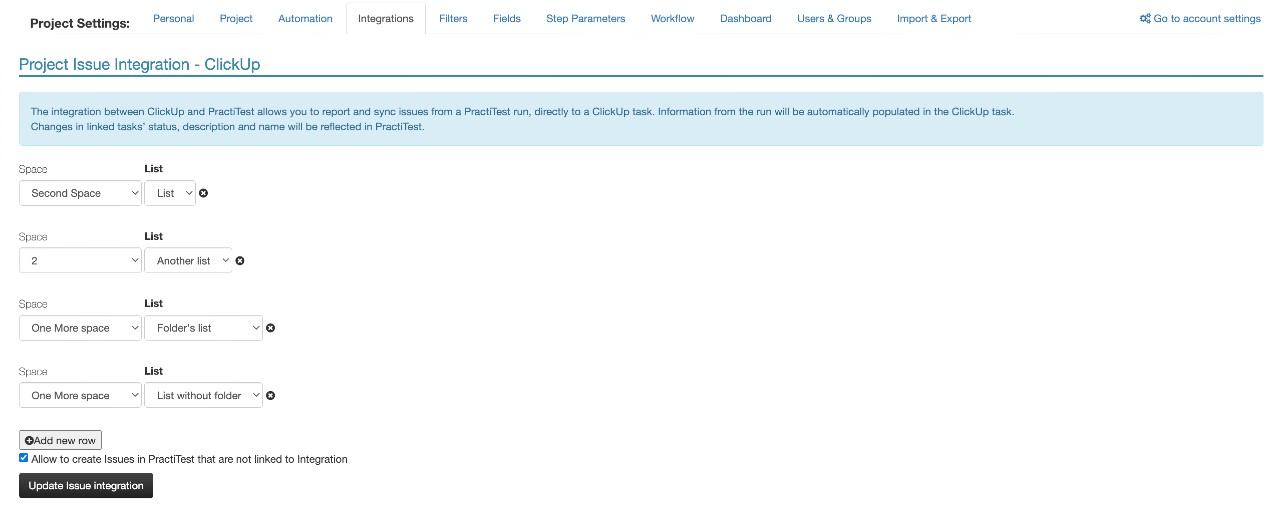
At the bottom of the page you can allow PractiTest to create internal issues that will not be synced to ClickUp.
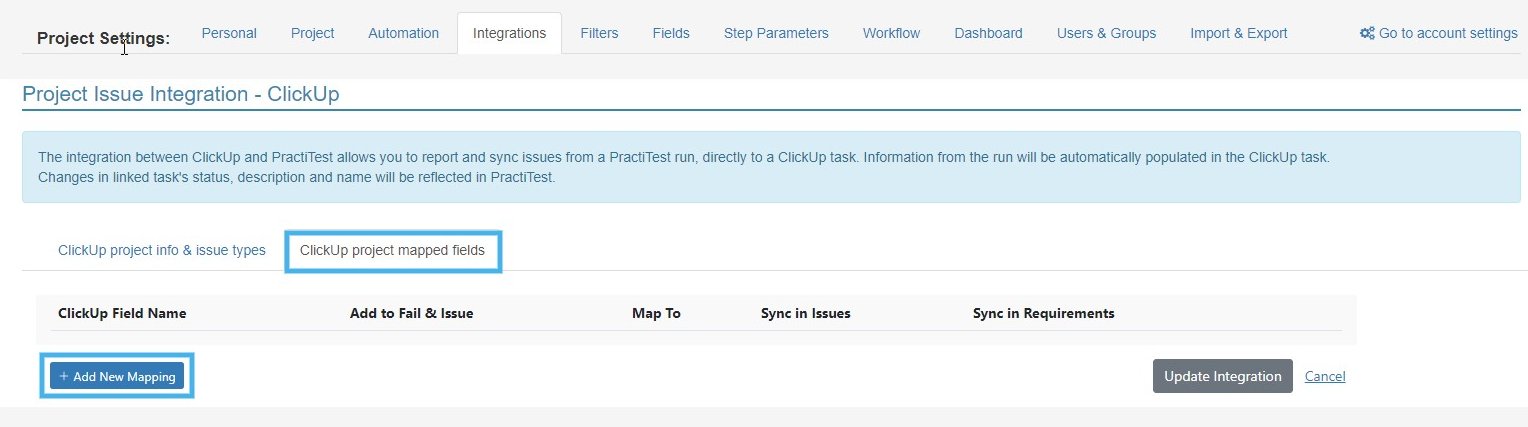
Mapping ClickUp Fields to PractiTest Fields
Note: Field sync needs to be configured for each PractiTest project separately.
In the project integration settings window, click the edit icon in the ClickUp integration box.

Go to the ‘ClickUp project mapped fields’ tab and click “Add New Mapping”.
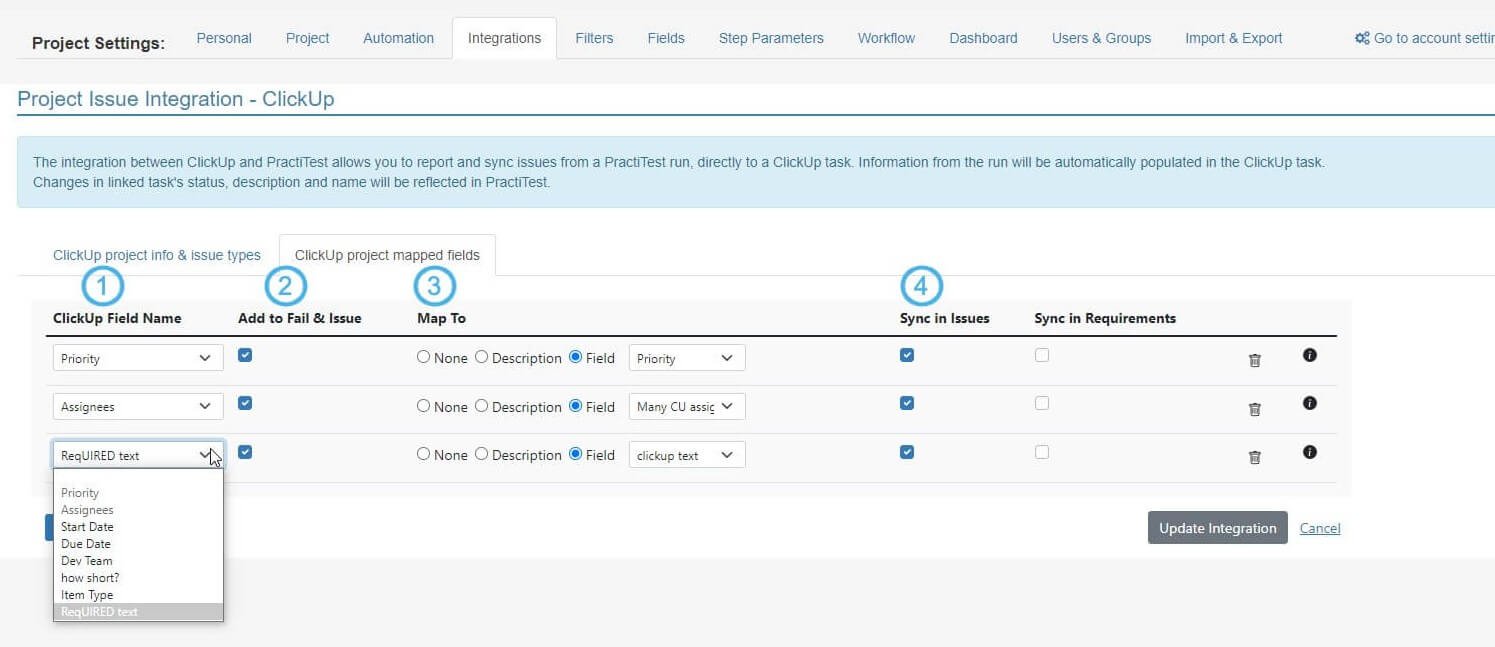
- Choose the ClickUp field you want to map. You can choose text, short text, drop-down, multi, labels, number, date, or priority type fields. The list of available ClickUp fields will contain only fields associated with Space-List pairs that were defined in the ‘ClickUp project info & issue types’.
- Tick the “Add to ‘Fail & Issue’” box if you want this field to appear when reporting an issue from PractiTest to ClickUp.
- Choose if and where you want to map this ClickUp field to - to a PractiTest dedicated field, or to the description of the PractiTest entity. Please note: If you choose to map it to a field - the list of PractiTest fields that will appear will contain only custom fields that match the type of the ClickUp field you chose (text/short text-text, number-number, multi-multi-list, etc) and are also linked to either requirements or issues. If you choose the ClickUp Priority field, you will be able to map it to the PractiTest Priority system field.
- Choose whether to present the data in the issues field or in the requirements field, or both. If the PractiTest field you chose is linked only to one of them, then you will have only that option to map to.
Click “Update Integration” to complete the field mapping.
Use the Integration
Upon the first action taken in the integration, the PractiTest user will see this message: ‘click here to link your ClickUp User’. Once done, both PractiTest and ClickUp users will be linked, recording any action on the correct user in both platforms.
Linking the users can also be done manually in the PractiTest personal settings area as explained here.
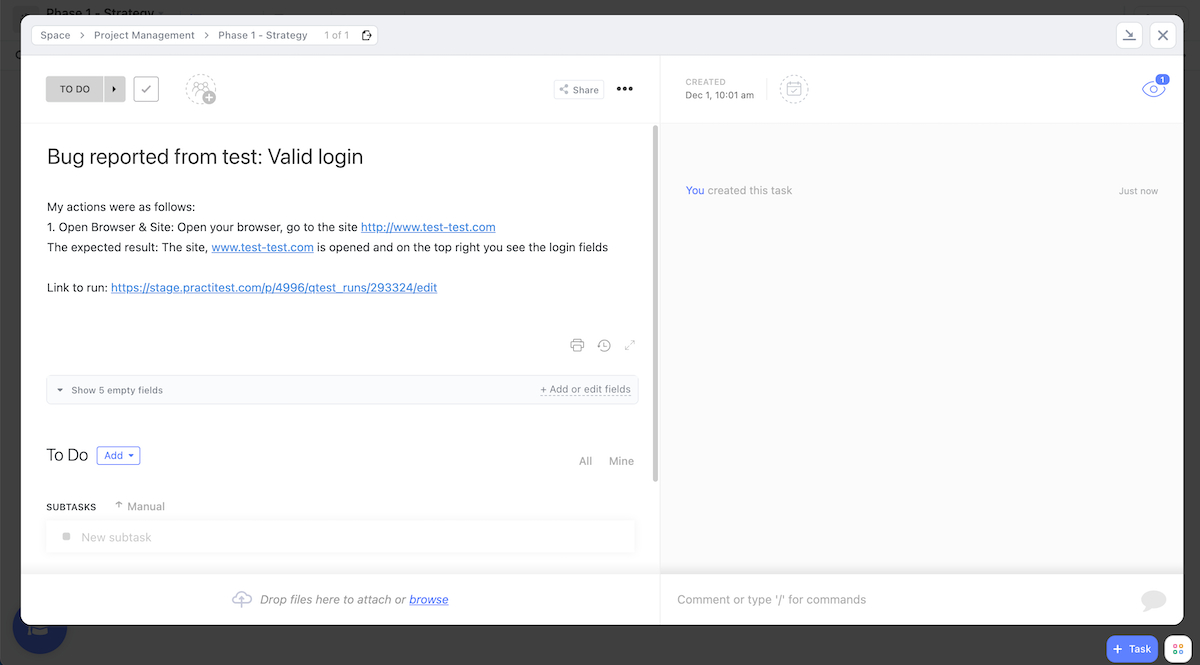
Report an Issue From PractiTest to a ClickUp Task
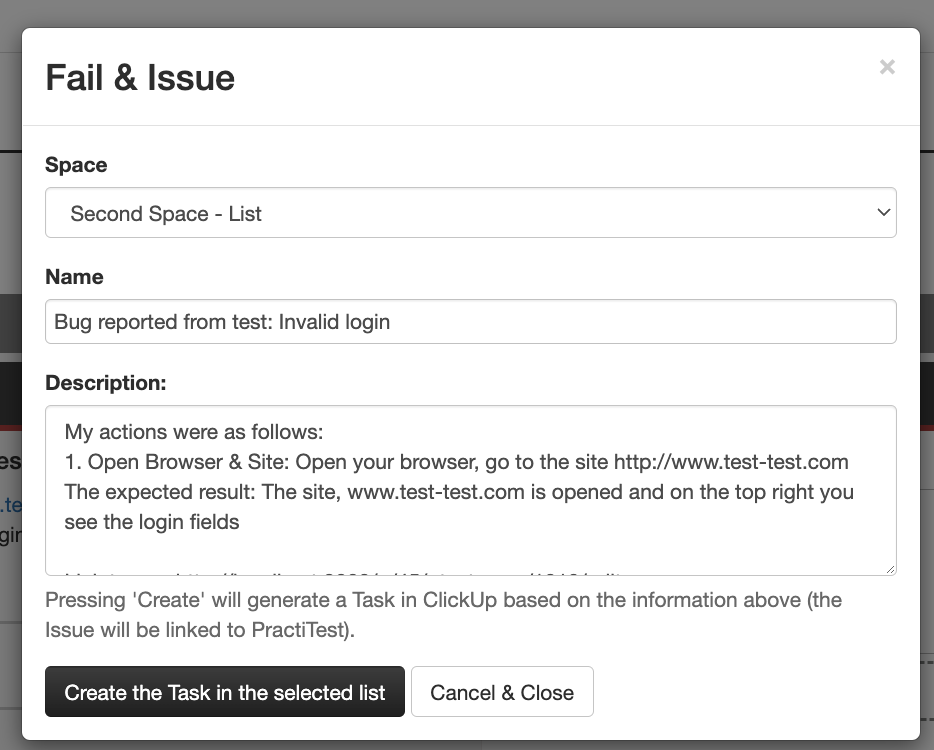
In PractiTest, run your test as usual. When encountering an issue, click the ‘Fail n’ Issue’ button. A pop-up window will appear (the first time you press the fail & issue button after configuring the integration, this might take a few seconds).
In the pop-up window:
- Choose the Space-List you want to report the task to.
- You will see all your run data pre-entered. You can edit the data.
- In case you added or removed a Space or a list in ClickUp after you configured the PractiTest integration, hit the “Refresh Spaces” Button to sync and view all the new & updated lists and Spaces to PractiTest.
Click ‘Create the Task in the selected list’.
In your run window and the issues module, you can find the PractiTest issue you just created and inside it a link to the synced ClickUp task you just created.

Any change to the ClickUp task’s name, description, and status will be reflected in PractiTest.
In case you defined your integration to allow internal PractiTest issue creation (that will not be created in ClickUp), your "Fail & Issue" button in your run window will open 2 options. The first will create the issue in PractiTest only, and the second will create the ticket in ClickUp as explained above.
Link a ClickUp Task to a PractiTest Run
In PractiTest, run your test as usual. When encountering an issue that you want to link to an existing ClickUp task, click the ‘Link Existing Issue’ link.
A new field will appear. Enter the ClickUp task ID you want to link to this step and press 'Link to step'.
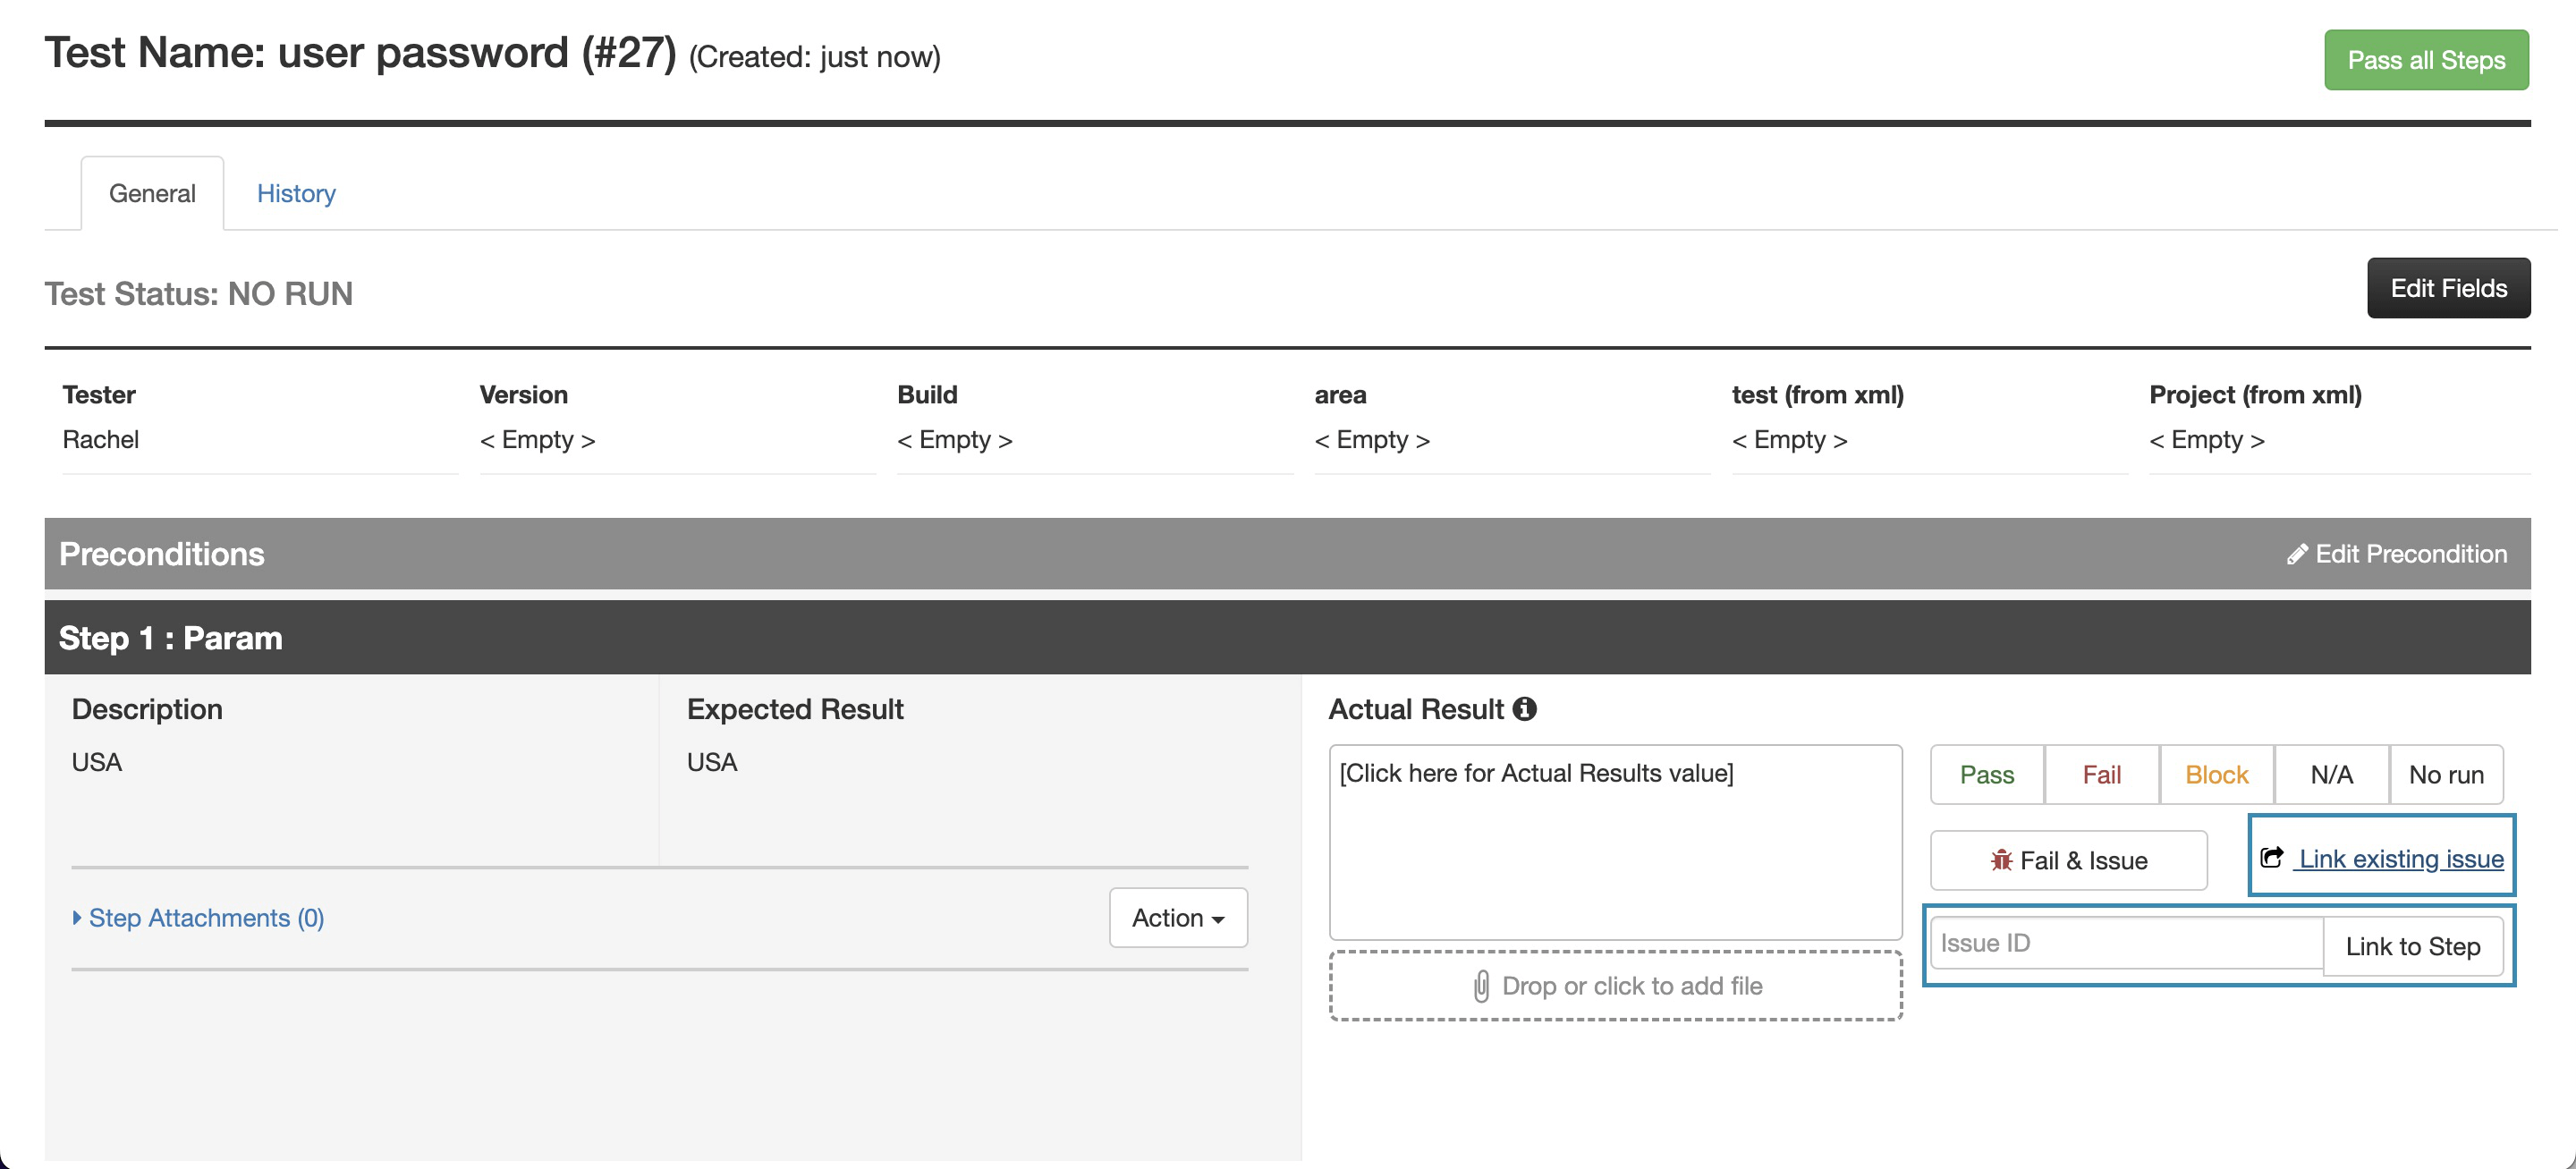
In your run window and the issues module, you can find the PractiTest issue you just created and inside it a link to the synced ClickUp task.
Any change to the ClickUp task’s name, description, and status will be reflected in PractiTest.
Sync an Issue From ClickUp
To sync an existing task from ClickUp to PractiTest as an issue, press the dropdown button on the top left side of the screen and choose 'Sync a new issue from ClickUp'.

Enter the ClickUp issue ID in the pop-up window. Please note you can sync a few ClickUp tasks at once by separating them with commas.
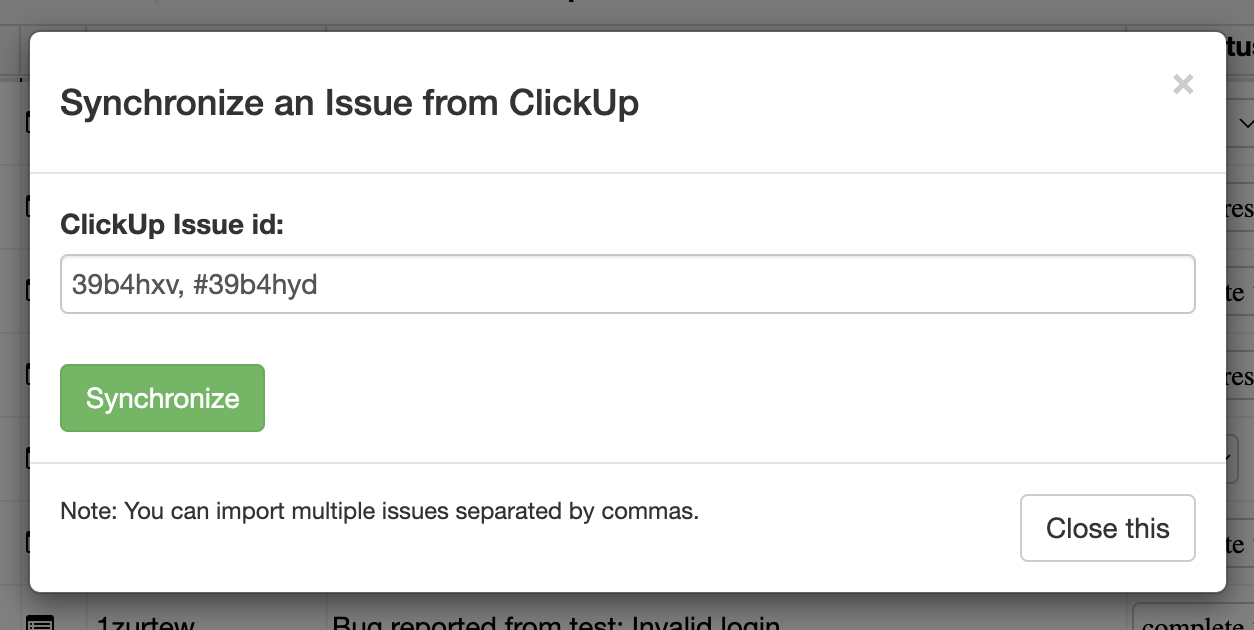
Press synchronize.
A new issue in PractiTest will be created for each task ID entered, with the title, description, and status of the synced ClickUp task.
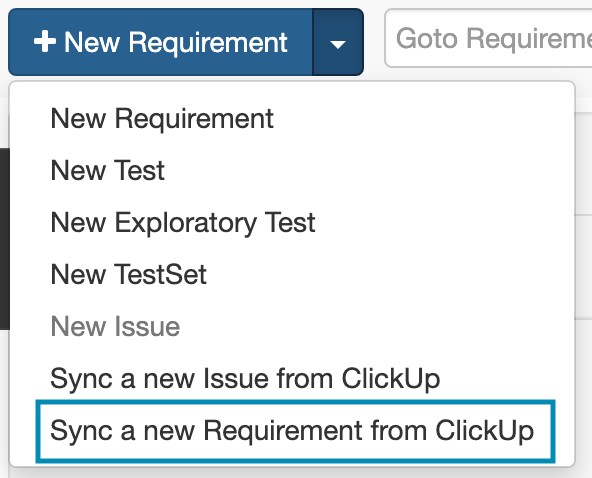
Sync a Requirement From ClickUp
To sync an existing task from ClickUp to PractiTest as a requirement, press the dropdown button on the top left side of the screen and choose 'Sync a new requirement from ClickUp'.
Enter the ClickUp issue ID in the pop-up window. Please note you can sync a few ClickUp tasks at once by separating them with commas.
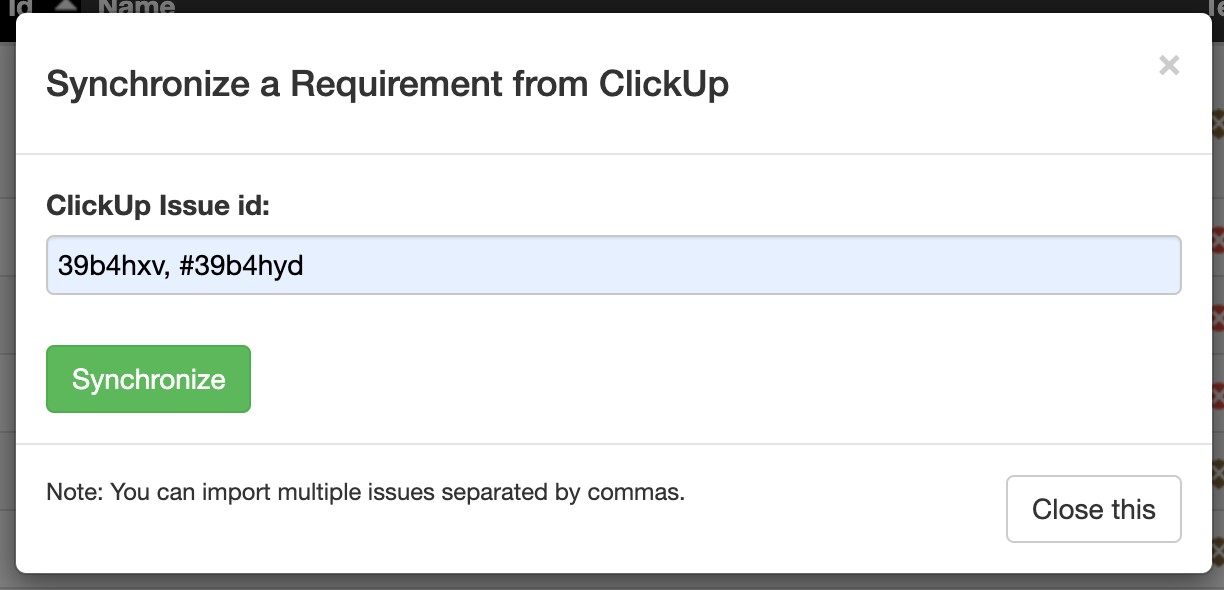
Press synchronize.
A new requirement in PractiTest will be created for each task ID entered, with the title, description, and status of the synced ClickUp task.
Create a New Synced ClickUp Task From a PractiTest Internal Issue
If you have internal PractiTest issues that are not synced to ClickUp (either because they were created prior to the integration or because you configured the integration to allow internal PractiTest issues), you can create a new synced ClickUp task from the internal issue.
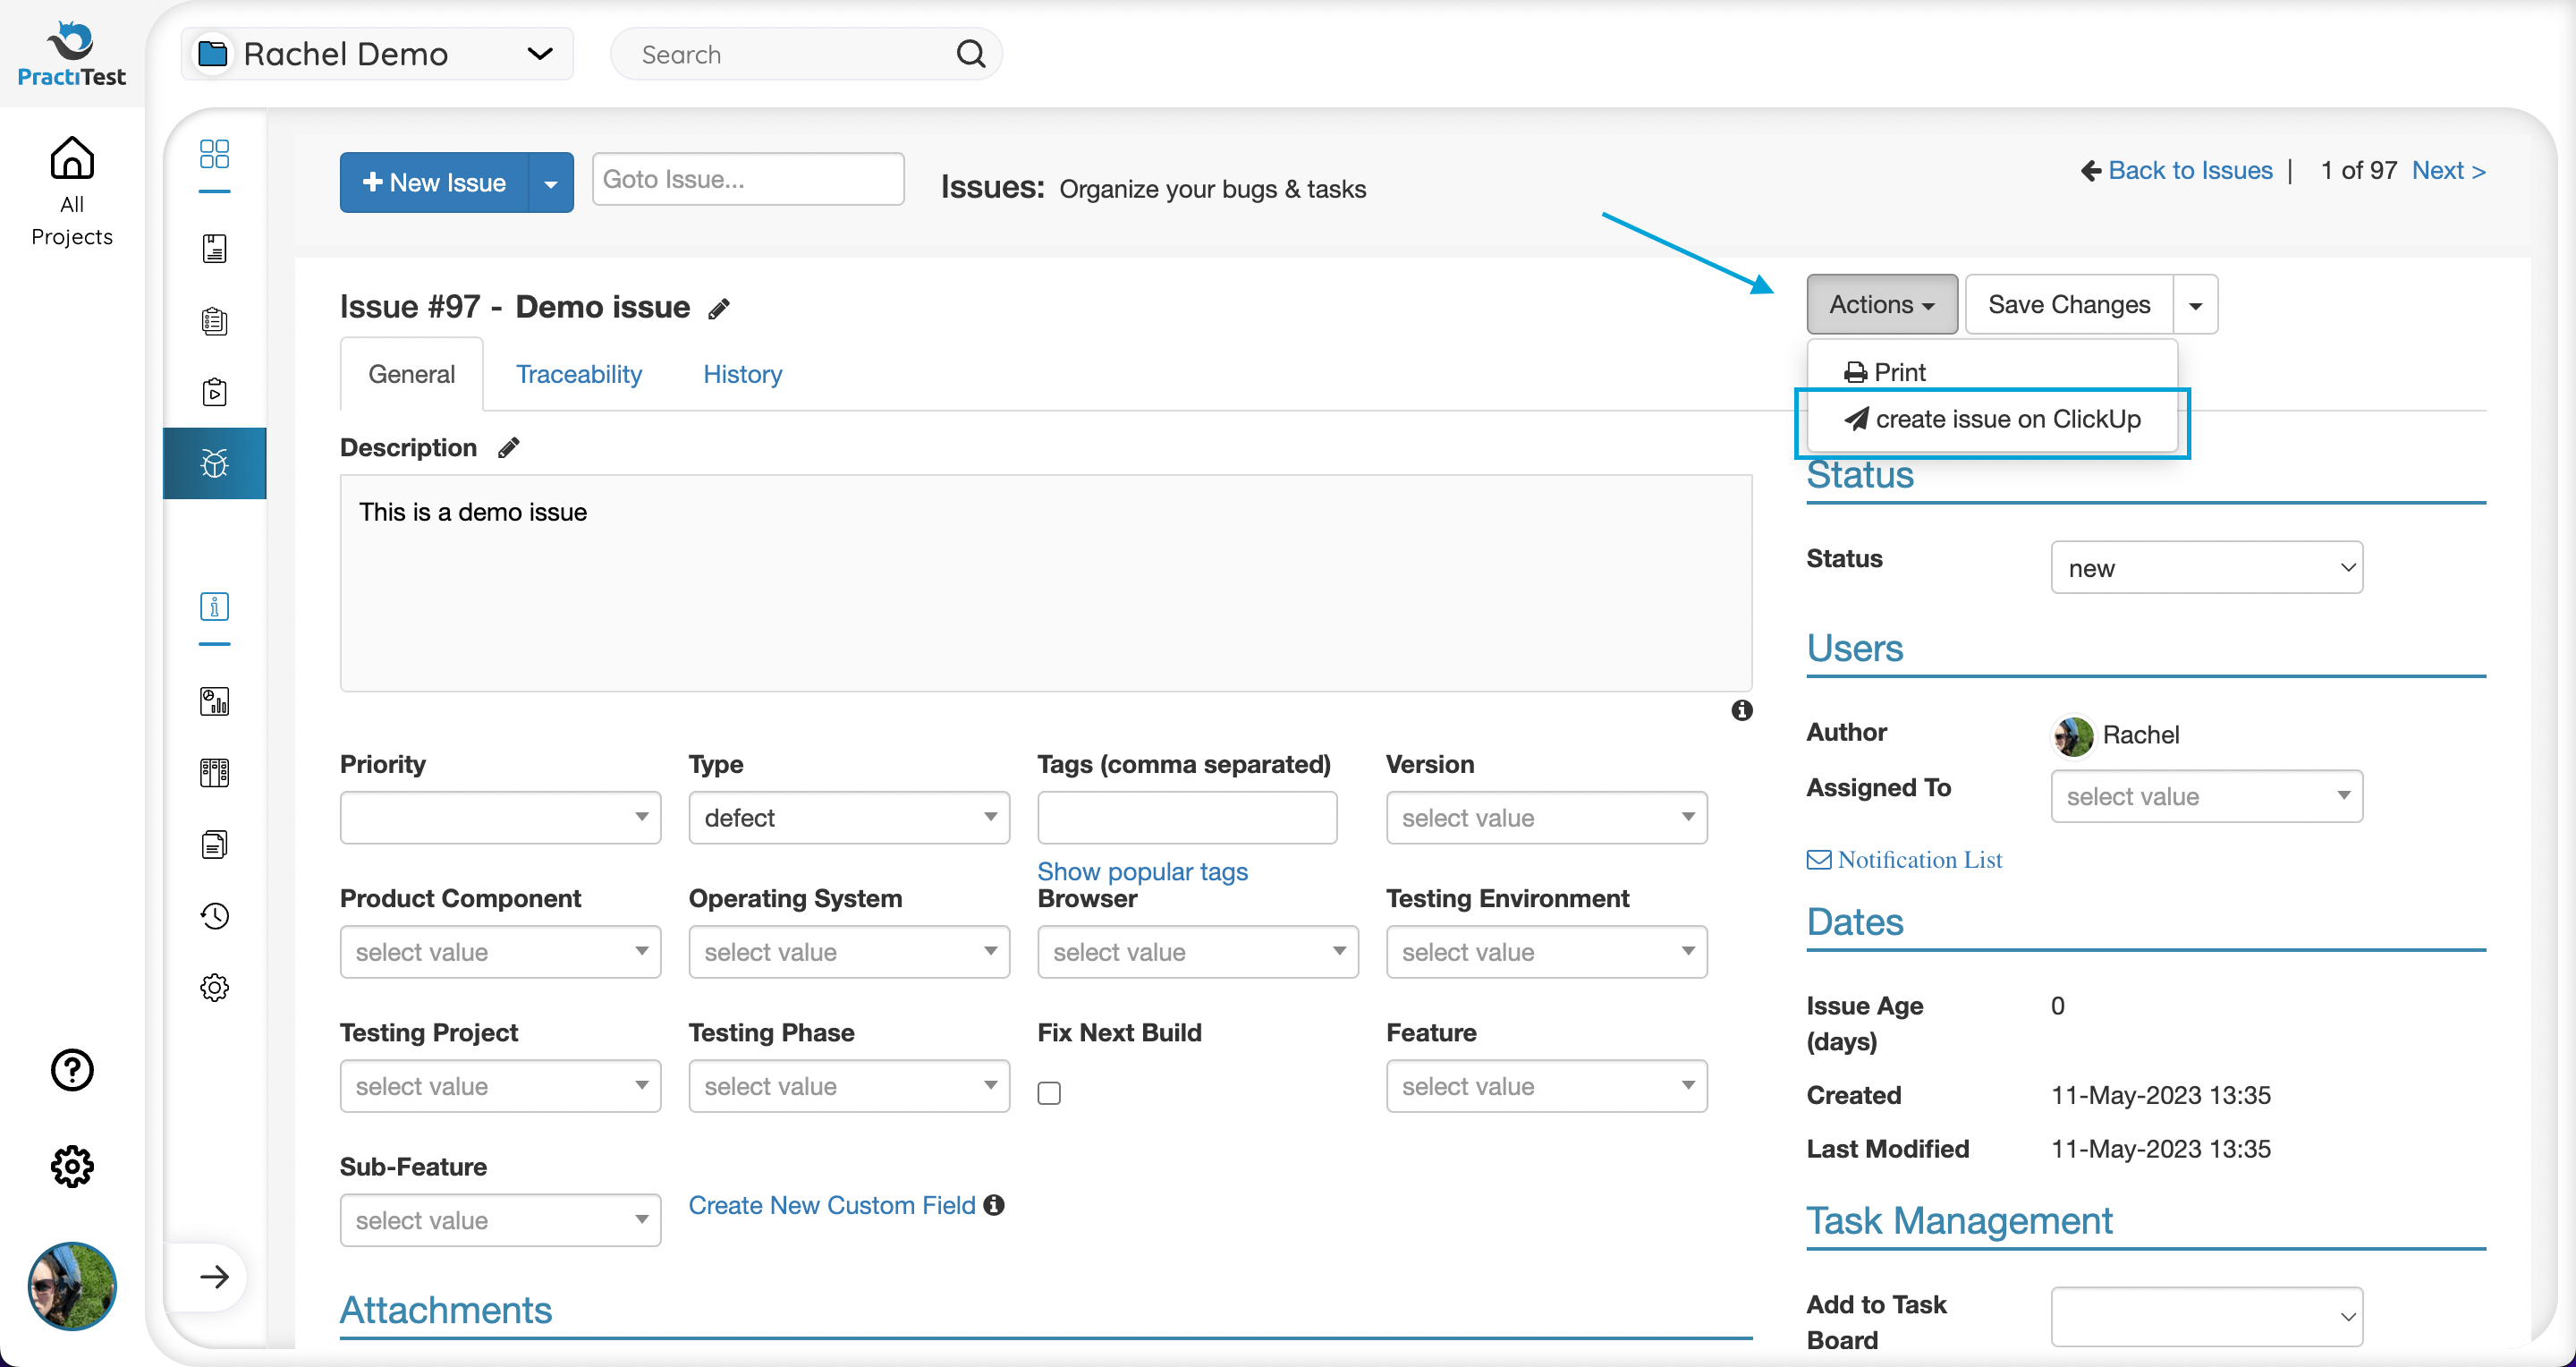
In the internal issue, click the Actions button and choose 'create issue on ClickUp'
A new pop-up window will appear where you can edit the information of your task. Please note that whatever information you edit in the pop-up window will override the information of the original issue.
If you have mapped fields configured in your project for issues, they will appear in the pop-up window, as well.
Press 'Create the Issue in ClickUp'

A new synced issue will be created in ClickUp with all the relevant information.